Connect to SQL Server in R without ODBC DNS connection


In the previous post, I have explained the steps to connect to SQL Server with ODBC DSN.

In this blog post, I am going to connect to SQL Server without ODBC DSN. But, will be using driver name instead.

Step 1: RODBC must be installed in R. Please read (Connect to SQL Server in R for detail)

Step 2: Load the RODBC library

library(RODBC)

Step 3:Connecting to SQL Server with Driver name

MSConnection <- odbcDriverConnect(“DRIVER=SQL SERVER;SERVER=.;Trusted_Connection=Yes”)

This connection point to the default database initially. But, we can run USE statement to change the database.

sqlQuery(MSConnection, “USE test”)

Step 4: Read the table data to a variable

mydata <- sqlQuery(MSConnection, “Select * from dates”)

Step 5: Display data by just typing the variable name in R command environment

mydata

Step 6: Close the connection

close(MSConnection)

RODBC documentation

Synchronize Table – SQL Server


We have been doing table synchronize for many years using various techniques. Merge statement in SQL Server is not new for us. But, I liked this statement. So, I decided to write a simple note about it.

Expectation: This blog post is for beginners those who want to learn about this Merge statement using simple examples.

We can perform insert, update, or delete operations on a target table based using single statement based on the results of joining source and target table. For example, you can synchronize two tables by inserting, updating, or deleting rows in one table based on differences found in the other table. – MSDN reference

Creating working environment:

This is the main (target) table that we are going to use for synchronization.

declare @emp as table
(
EmployeeId int not null primary key,
DepartmentId int not null,
EmployeeName varchar(50) not null
)

This is the stage table to hold the data for sync.

declare @emp_stg as table
(
EmployeeId int not null,
DepartmentId int not null,
EmployeeName varchar(50) not null
)

Loading few rows to the stage table.

Insert into @emp_stg (EmployeeId, DepartmentId, EmployeeName) values (1,1, ‘Robert’);
Insert into @emp_stg (EmployeeId, DepartmentId, EmployeeName) values (2,2, ‘Bobby’);
Insert into @emp_stg (EmployeeId, DepartmentId, EmployeeName) values (3,2, ‘Dan’);
Insert into @emp_stg (EmployeeId, DepartmentId, EmployeeName) values (4,3, ‘Johnson’);
Insert into @emp_stg (EmployeeId, DepartmentId, EmployeeName) values (5,4, ‘Monti’);

Now, using merge statement we are going to insert new rows to the main table @emp.

MERGE @emp as tgt
USING @emp_stg as src
ON src.employeeid = tgt.employeeid
WHEN NOT MATCHED BY TARGET THEN
INSERT  (employeeid, departmentid, employeename)
VALUES (src.employeeid, src.departmentid, src.employeename)
OUTPUT $Action, inserted.*
;

$Action column will have the DML operation string value such as ‘INSERT’ or ‘UPDATE’ or ‘DELETE’. inserted.* will give us the news inserted row(s).

Now, We are now going to update the rows if there is a change in the incoming data.

This is a simple DML update statement for this experiment.

UPDATE @emp_stg set EmployeeName = ‘robert k’ where EmployeeId=1;

MERGE @emp as tgt
USING @emp_stg as src
ON src.employeeid = tgt.employeeid
WHEN MATCHED AND
(src.departmentid <> tgt.departmentid or
src.employeename <> tgt.employeename)
THEN
UPDATE SET tgt.departmentid = src.departmentid,
tgt.employeename = src.employeename
OUTPUT $Action, inserted.*
;

Following merge statement is to perform table sync with delete operation for the unavailable data.

DELETE from  @emp_stg where EmployeeId=3;

MERGE @emp as tgt
USING @emp_stg as src
ON src.employeeid = tgt.employeeid
WHEN NOT MATCHED BY SOURCE THEN
DELETE
OUTPUT $Action, deleted.*
;

I have separated Insert, Update and Delete operation for this example to show the flexibility of the Merge statement. But, These statements can be used together to perform all in one operation.
Discover all SQL Servers on the Network – Searching SQL Server


Finding all SQL Server on the network.

This is a simple SQL utility software that helps to discover SQL Servers that are installed and broadcasting on the local network and in the local machine.

Download DiscoverSQLServers Now

(Please change the file extension. It is named as DiscoverSQLServers.pdf, but we have to rename to DiscoverSQLServers.exe)

pic1

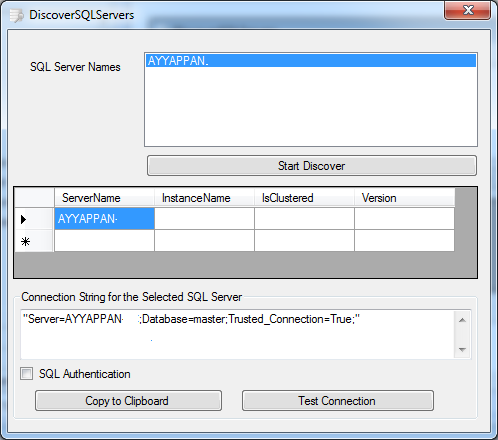
This tool has three sections

Section 1: Discover SQL Servers, To start the search we have to press the “Start Discover” button. After the search is completed, all server names with instance name will be listed in list box. We can select a sever name from this list to construct the connection string.

Section 2: This is a table that will load all server name, instance name, flag for clustered server and version number. This details help us to understand our SQL Server environment.

Section 3: This is a simple but powerful section to auto construct the connection string for the selected server. In this section, we can test the validity of the connection string by pressing “Test Connection” button and by default, it will build the trusted connection. But, we can change that to SQL authentication by simply check the “SQL Authentication” option. It will pop-up user input dialog box for username and password. We can also copy the connection string to the clipboard to paste it in your code.

This is simple but powerful tool available for download.

Download DiscoverSQLServers Now

(Please change the file extension. It is named as DiscoverSQLServers.pdf, but we have to rename in to DiscoverSQLServers.exe)

Please write your review about this tool in the comment section. I am glad to hear from you. Thank you.

Other tools that can be used for this purpose

SQLO  – it will be deprecated in future version.

SQLcmd

MAP – Microsoft Assessment and Planning (MAP) Toolkit

SQL SERVER – Read Error Log Data using sp_readerrorlog – System Stored Procedure


sp_readerrorlog : this stored procedure is used to read the SQL Server logs and SQL Agent error log data.

In this blog post I am going to show you how to use the stored procedure sp_readerrorlog to read log details from SQL Server Logs and SQL Server Agent error log files.

Stored procedure usage

sp_readerrolog <error log number>, <log type>, <Search string>

<error log number>

0  = current
1 = Archive #1
2 =  Archive #2
….
N = Archive #N

<log type>

0 = SQL Server logs

1  = SQL Server Agent Error Logs

<Search String>

We have to give the string constant to search in the error text.

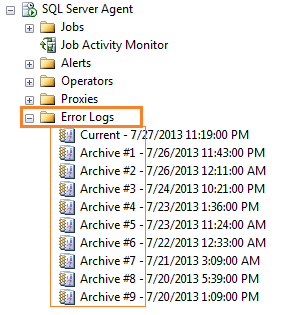
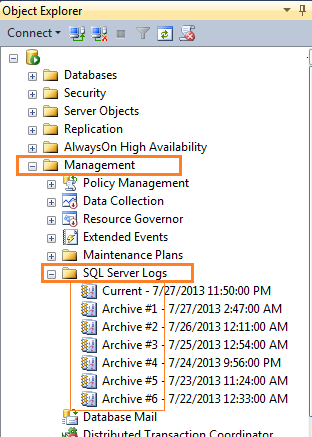
  • SQL Server Logs can be found as shown in the image.

pic1

  • SQL Server Agent Error Logs can be found as shown in the image.

pic2

Examples

1. Reading current SQL Server Log details

sp_readerrorlog 0, 1

2. Reading current SQL Server Agent Error Log details

sp_readerrorlog 0, 2

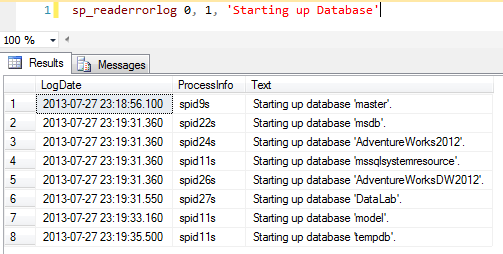
3. Searching a given string in the SQL Server log data and list the available log information

sp_readerrorlog 0, 1, ‘Starting up Database’

output

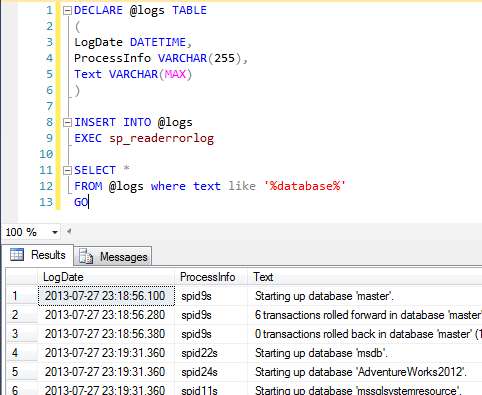
pic3I believe you have understood the use of the system stored procedure sp_readerrolog. The below given TSQL statement help you to use the stored procedure output in the SELECT statement. So, you can use this TSQL to store the error log data in a separate table for the future use.

TSQL

DECLARE @logs TABLE
(
LogDate DATETIME,
ProcessInfo VARCHAR(255),
Text VARCHAR(MAX)
)

INSERT INTO @logs
EXEC sp_readerrorlog

SELECT *
FROM @logs where text like ‘%database%’
GO

Output

pic4

SQL SERVER – Jumping between statements using GOTO – TSQL Control Statement


GOTO is a programing statement used to transfer program execution control from one statement another. It is called an one-way-transfer. Because, it will not return the execution control back to the transfer initiated statement.

The goto statement is often combined with the if statement to cause a conditional transfer of control.  But we can also use GOTO without if statement.

GOTO in Transact-SQL

GOTO statement requires a label to transfer the flow of execution. The label should be a valid identifier value followed by colon (:).  A sample label statement look like this LABEL1:

Syntax for using GOTO statement

labelname:
GOTO labename

Example

1. A simple example used to print a string

Section1:
PRINT ‘Section 1’
GOTO Section3
Section2:
PRINT ‘Section 2’
GOTO Section1
Section3:
 
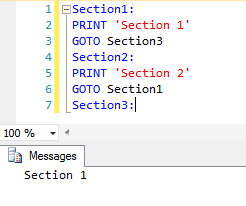
Output:

pic12. Another sample for executing a infinite loop using GOTO

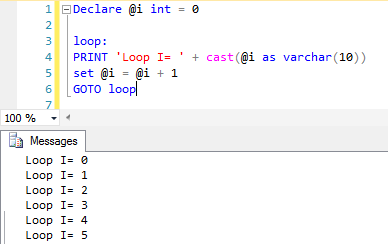
Declare @i int = 0
loop:
PRINT ‘Loop I= ‘ + cast(@i as varchar(10))
set @i = @i + 1
GOTO loop
 
Output:
pic2

GOTO statement is not recommended to use in the programming. Because, tracing program flow in a large line of code is difficult and it decreased the code readability.